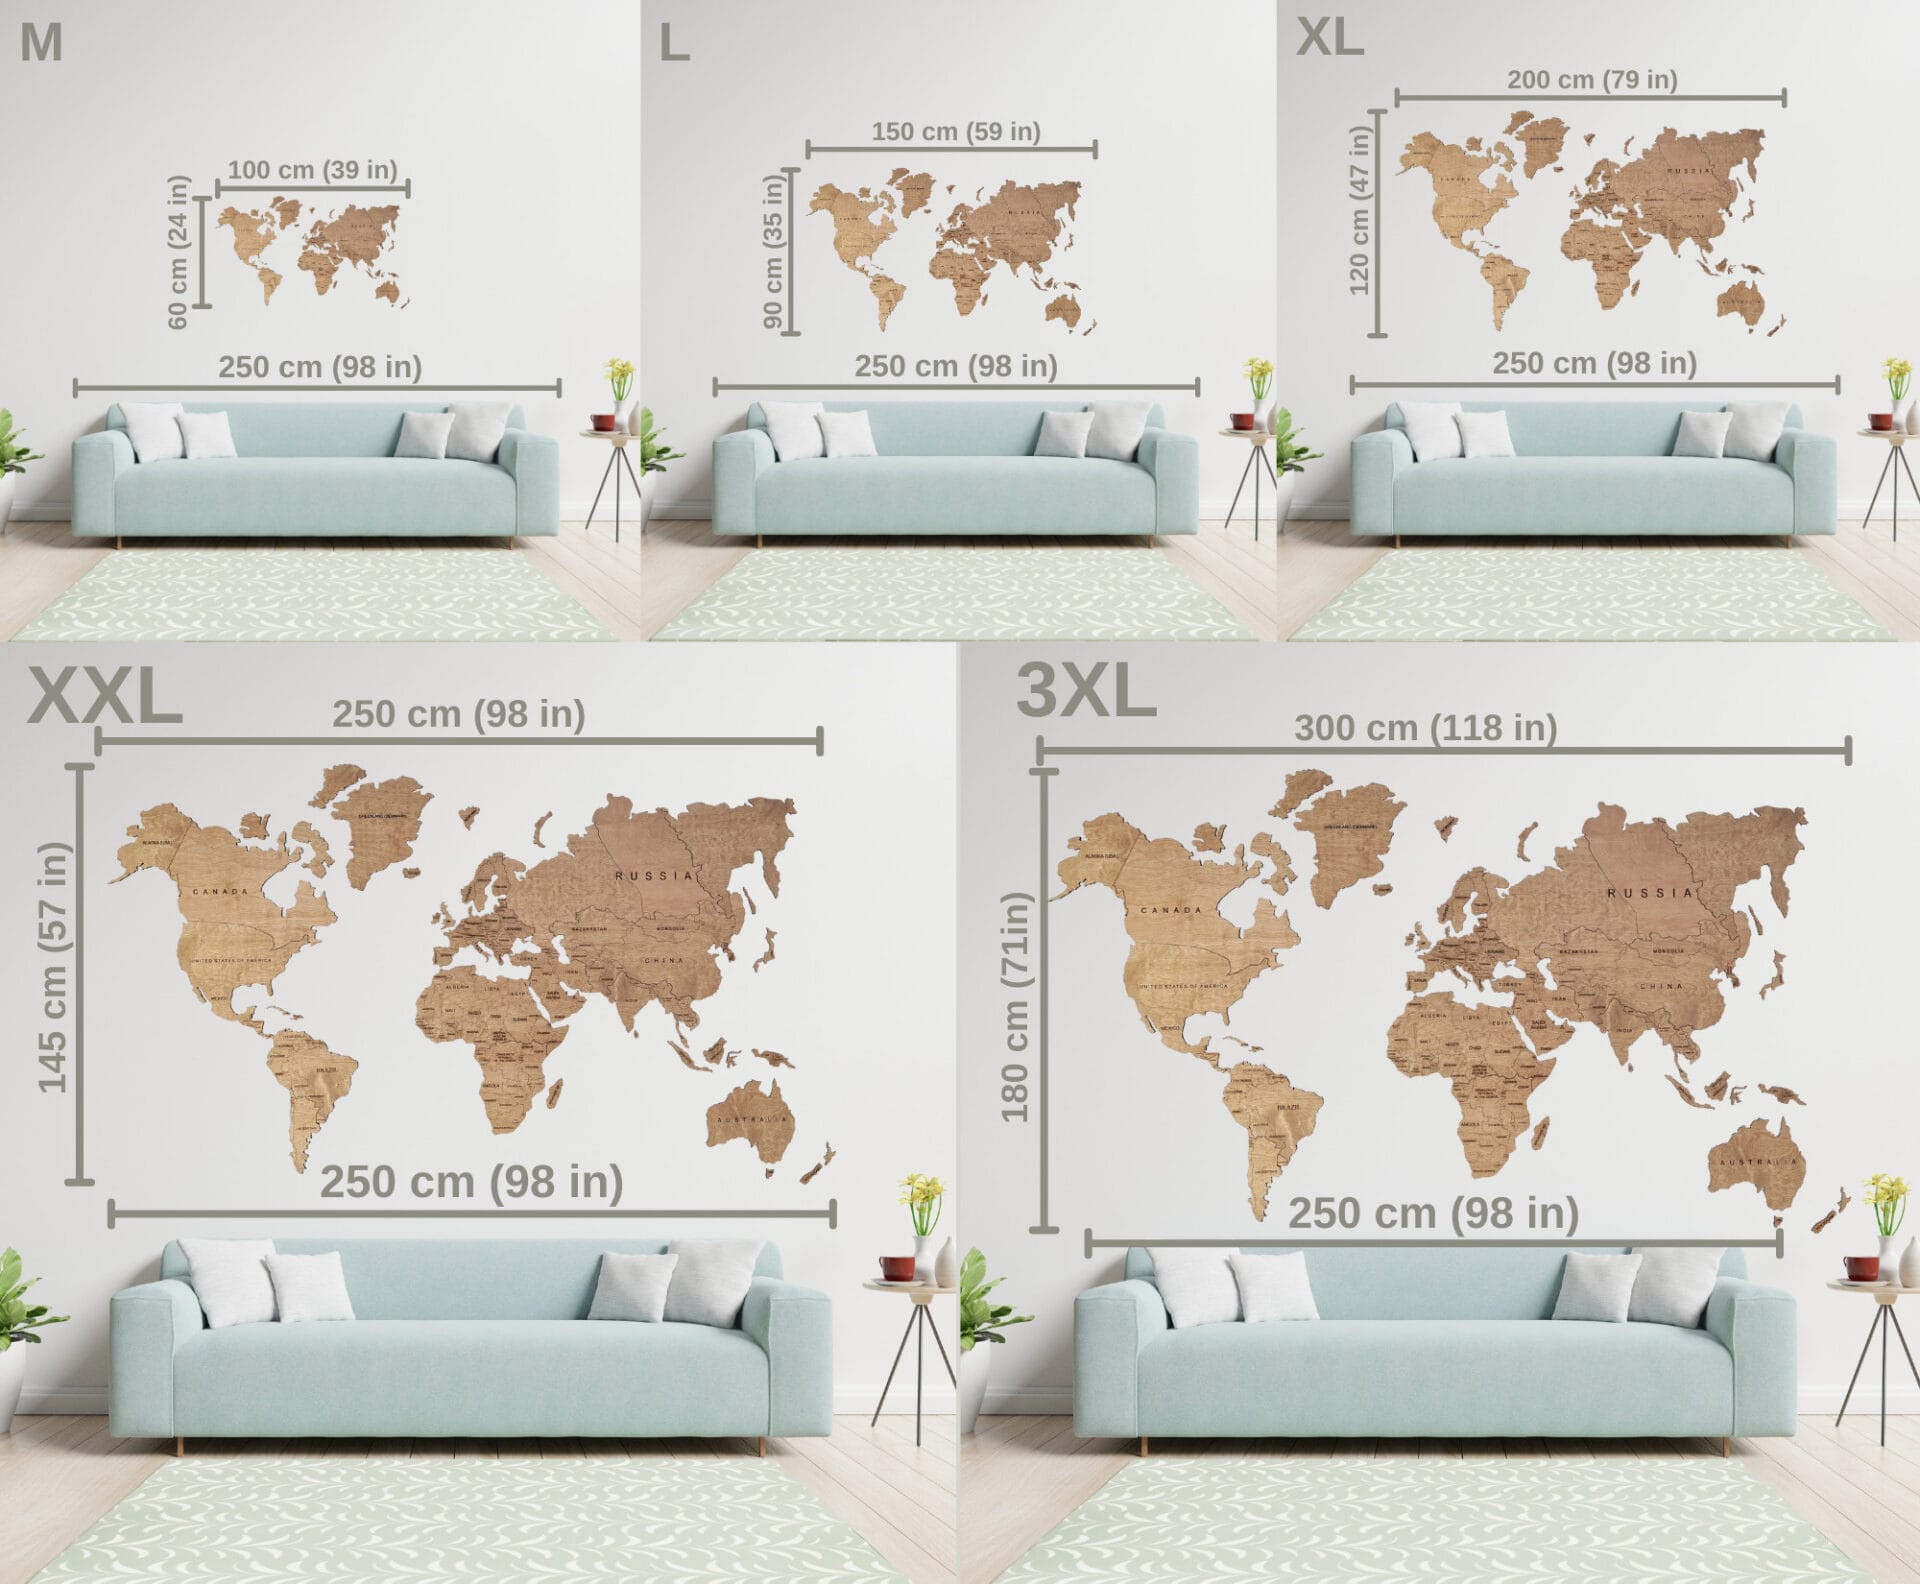
Choosing the right wooden world map size starts with the wall, not the size label. Select the largest format that fits comfortably within your usable display area while leaving clear visual space around it and considering nearby furniture. The available sizes are M: 100 x 60 cm (39.4 x 23.6 in), L: 150 x 90 cm (59.1 x 35.4 in), XL: 200 x 120 cm (78.7 x 47.2 in), XXL: 250 x 145 cm (98.4 x 57.1 in), and 3XL: 300 x 180 cm (118 x 71 in).
A map can become a defining feature of a room, but its scale matters. A format that is too small may feel lost on an open wall, while one that fills every available centimetre can make the area feel crowded. This wooden world map size guide will help you measure, compare and visualize the options before making your choice.
Wooden world map sizes at a glance
When comparing wooden world map sizes, use the actual dimensions rather than relying on M, L, XL, XXL or 3XL alone. The first measurement is the width, and the second is the height. For example, a map measuring 150 x 90 cm is 150 cm wide and 90 cm high.
Compare both measurements before choosing your map. The first number is the width and the second is the height of the assembled map shown in our size guide.
Wooden world map dimensions: width × height| Size | Centimetres | Approximate inches |
|---|
| M | 100 × 60 cm | 39.4 × 23.6 in |
|---|
| L | 150 × 90 cm | 59.1 × 35.4 in |
|---|
| XL | 200 × 120 cm | 78.7 × 47.2 in |
|---|
| XXL | 250 × 145 cm | 98.4 × 57.1 in |
|---|
| 3XL | 300 × 180 cm | 118 × 71 in |
|---|
For 3XL, allow for the full 300 cm width and 180 cm height, not just the width. Check the information for your selected product and layout before ordering. If you plan to arrange additional islands or accessories around the map and are unsure whether they are included in the stated dimensions, contact us to confirm the complete display area.
Writing these measurements down or comparing them directly with your wall will give you a much clearer impression of scale than a product image viewed on a screen. Images can be useful for style inspiration, but the dimensions are what determine whether the map will sit comfortably in your chosen location.
You can view the available wooden world map sizes while keeping your wall measurements close at hand. This makes it easier to compare each format with the space you have planned.
Measure the usable area of your wall
Before deciding how to choose a wooden world map size, identify the part of the wall that is genuinely available for display. This is not always the same as the full width and height of the wall. A doorway, window, radiator, built-in shelf, light switch, curtain or existing wall feature may reduce the clear space considerably.
Use a tape measure to find the width and height of the open area where you would like the map to sit. Measure from the points that form the real boundaries of the display area, rather than from one end of the entire wall to the other. If the wall has a low ceiling, sloping section, shelving or a nearby architectural feature, include that in your assessment from the start.
- Choose the intended position for the map.
- Measure the clear width available in that position.
- Measure the clear height available above and below nearby furniture or features.
- Write both measurements down.
- Measure a second time before comparing the space with the map dimensions.
Measuring twice is a simple step that can prevent an avoidable decision based on an estimate. It is also useful to note where the centre of the available area falls, especially if the map will be positioned above furniture or between other features.
Focus on the clear display area, not simply the biggest wall in the room. A large wall may contain several visual zones, and a map often looks most intentional when it is placed within one defined area rather than treated as though every part of the wall is available.
Leave visual space around the map
A wooden map wall size should allow for visible wall space around the design. These margins help the map read as a focal point, give its outline room to be appreciated and prevent the wall from feeling overly full. The goal is not to fill a wall edge to edge, but to create a balanced composition.
After identifying the usable area, think about the space that will remain at the top, bottom and sides once the map is in place. A narrow margin on one side and a much wider margin on the other can make a display feel unintentionally off-centre, unless that asymmetry is part of the wider room layout.
Visual space is especially important near corners, ceilings, windows and shelves. If the edge of the map sits too close to one of these features, the map may appear compressed even when its dimensions technically fit. Leaving a clear border gives the room a calmer, more considered appearance.
A larger wall does not automatically call for the largest format. If the room already has strong elements such as shelving, artwork, patterned curtains or substantial furniture, a slightly more restrained map size may preserve an open and balanced feeling. On the other hand, an uncluttered wall may support a stronger visual presence. The right choice is the format that works with the whole setting, not simply the maximum size that can be accommodated.
Check furniture and nearby room features
Furniture helps define the visual scale of a wall display. If the map will hang above a sofa, bed, desk, sideboard or dining table, measure the furniture width as well as the available wall area. Then consider how the proposed map outline relates to it from your usual viewpoint.
A map placed above furniture should feel connected to that part of the room without appearing squeezed between the furniture and the ceiling. Its height should also be considered carefully. Hanging a map too low can make it feel crowded by the furniture beneath it, while placing it too high may create a visual gap that separates it from the rest of the arrangement.
Look beyond the central furniture piece as well. Tall floor lamps, open shelving, mirrors, curtains, plants and existing artwork can all affect how much visual attention the map receives. These elements do not necessarily rule out a particular size, but they should be included in the overall view before you decide.
Consider where the map will be seen most often. Stand or sit in the places you naturally use: a seating area, dining chair, desk or entryway. From each position, check whether the chosen wall area is clearly visible and whether the map will have enough surrounding space to remain a distinct feature.
Visualize the map size before you choose
Measurements establish what can fit, but a full-size outline is one of the best ways to understand how a map will feel in the room. Painter’s tape or sheets of paper can be used to mark the width and height of your preferred format directly on the wall.
- Choose one of the available dimensions.
- Mark the width and height on the wall with painter’s tape or paper.
- Check that the outline is level and positioned where you intend the map to be.
- Step back and view it from different parts of the room.
- Repeat the process with another size if you are deciding between two options.
This simple test turns abstract numbers into a real visual reference. You may find that a size that seemed modest on paper has a strong presence when outlined on the wall, or that a larger option still leaves more open space than expected.
View the outline in natural daylight and with your usual room lighting if possible. Notice how it relates to furniture, wall features and clear space around it. It can also be helpful to leave the outline in place for a little while, so you can see it during normal use of the room rather than judging it only in one quick glance.
When comparing two wooden world map sizes, avoid making the choice only from a tape measure. Test both outlines. The difference between 150 x 90 cm (59.1 x 35.4 in) and 200 x 120 cm (78.7 x 47.2 in), for example, can feel more significant on the wall than it does when written as dimensions.
Three practical map-size examples
These are illustrative calculations, not customer installations or universal interior-design rules. They compare the stated map dimensions with an example wall or sofa. Check the footprint of your complete chosen layout separately.
Example 1: a 220 cm-wide display area
A centred L map, 150 cm wide, leaves 35 cm on each side. An XL map, 200 cm wide, leaves 10 cm on each side. Both widths fit, but L leaves more open wall space while XL fills more of the area.
Remember to check height as well: L is 90 cm high and XL is 120 cm high. A wide wall area can still be too shallow for your preferred size.
Example 2: a map above a 240 cm-wide sofa
An XL map is 200 cm wide, so it is 40 cm narrower than the sofa. When centred above it, each map edge sits 20 cm inside the corresponding sofa edge.
An XXL map is 250 cm wide, extending 5 cm beyond each sofa edge when centred. Neither proportion is automatically right or wrong. Compare the options in a photo of your room, and check the available wall width and height before deciding.
Example 3: 3XL in a 350 × 220 cm display area
A 3XL map measures 300 × 180 cm. Centred within an unobstructed area 350 cm wide and 220 cm high, it leaves 25 cm on each side and 20 cm above and below.
The stated assembled-map dimensions fit this example area. Those margins are a calculation, not a minimum-clearance recommendation or confirmation that extra accessories will fit. Check the boundaries of your complete chosen arrangement before ordering.
Calculate the space left around your map
Subtract the map width from the usable wall width. If you want to centre the map, divide the result by two to find the space on each side. Repeat the calculation with the heights to find the space above and below.
This calculation helps you check physical fit. Your preferred amount of open wall space remains a personal choice.
How to narrow down your final size choice
Once you have measured and tested the display area, the final choice can be made with a straightforward process. Begin by removing any size that exceeds the usable wall space or would sit too close to an obstacle. There is no benefit in choosing a format that technically fits but leaves no room for the map to breathe.
- First: rule out any format that is wider or taller than your clear display area.
- Next: compare the remaining options with the visual margins you want around the map.
- Then: check the relationship between the proposed size and nearby furniture.
- Finally: choose the visual effect you prefer: a more understated presence or a stronger wall feature.
If two sizes both work well, there is no universal answer. The smaller option may suit a room where you want to retain a lighter, quieter wall arrangement. The larger option may be right when you want the map to play a more prominent role in the space. Your taped outlines and everyday viewing positions are useful guides at this stage.
Before ordering, review the dimensions one final time: M is 100 x 60 cm (39.4 x 23.6 in), L is 150 x 90 cm (59.1 x 35.4 in), XL is 200 x 120 cm (78.7 x 47.2 in), XXL is 250 x 145 cm (98.4 x 57.1 in), and 3XL is 300 x 180 cm (118 x 71 in). Confirm that you are comparing width with wall width and height with wall height, and that the chosen position remains clear of nearby features.
Common wooden world map sizing mistakes to avoid
A thoughtful sizing decision is often less about finding a perfect formula and more about avoiding a few common planning errors.
- Choosing from a photograph alone: Product images cannot show the exact scale of your own wall, ceiling height or furnishings. Always measure the intended location.
- Using the full wall dimensions: Doors, windows, shelves and other interruptions can make the true display area much smaller than the wall itself.
- Filling every available centimetre: A map needs visible space around its edges to remain distinct and visually balanced.
- Ignoring nearby furniture: A map should be considered as part of the arrangement around it, not as an isolated rectangle on a blank wall.
- Skipping the outline test: A taped or paper outline can reveal scale, height and spacing issues that measurements alone may not show.
Taking the time to measure, mark and step back gives you a more confident basis for choosing. It also helps ensure the map complements the room as it is used every day.
If you have additional questions before choosing, visit the wooden world map FAQ for further guidance.
Ready to compare the available formats? View the available wooden world map sizes in M, L, XL, XXL and 3XL, then choose the option that suits your measured wall space.